CentOS 7 Default Set Up
Blog post created on 2015-07-20
In this tutorial I describe the initial configuration of my dedicated servers before they get assigned to a specific task. The set up is reasonably secure for most use cases and is a good starting point to follow on any dedicated machine (including VPS). I will assume you are starting from a fresh bare bone CentOS 7 install as given by any normal hosting company without any pre installed admin panel or similar (like Plesk, cPanel etc.). I will also assume you have root access.
Verify Access
The hosting company should have provided the root password and the IPv4 address for your new machine. It is a good idea to ask immediately for a second IPv4 address if possible. Usually, if your server is located in Europe, you would be required to provide a RIPE justification for the second IP. You can simply mention that you need to install an SSL certificate and that should be sufficient. Along with the IPv4 you should also have an IPv6 address. If not, consider changing hosting company.
To access the server you need an SSH client. SSH is the default protocol used to log into Unix like operating systems. Windows users can use PuTTY whilst Mac users already have the command line ssh client installed. As I personally work from a Windows machine the following tutorial is Windows friendly but the same steps apply for Mac (or other) users. So go ahead and download PuTTY, Pageant and PuTTYgen from the official page. These are self standing executable files and I personally save them inside C:\\Program Files\\Putty or similar.
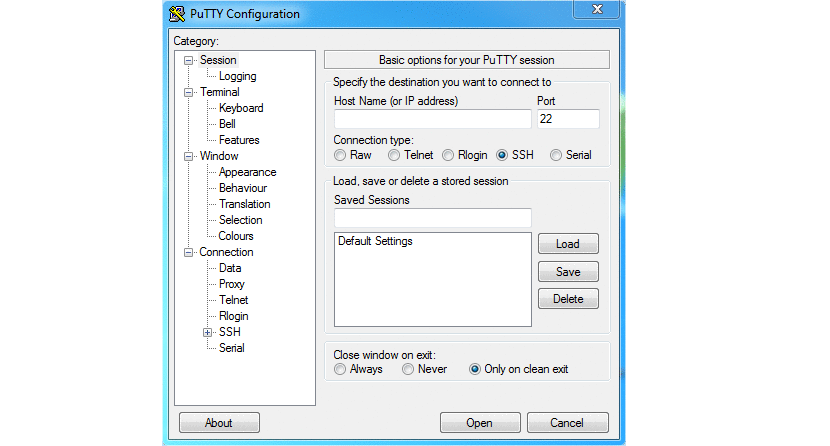
Launch PuTTY and type your IPv4 address in the Host Name (or IP address) field and click Open. If everything works correctly you should be prompted to insert your user name which in this case will be root and press enter. Next type your password and press enter again. You should now be logged into your new server.
Network Configuration
The following steps ensure your network is nice and tidy.
Hostname
Something I find very useful is to have hostnames for each of my dedicated servers. If possible you should purchase a .net domain (indicates network) and assign a hostname to your machine. For example, for a web server you could have web0.DOMAIN.net. You would do this by creating an A record for your IPv4 address and a AAAA record for your IPv6 address. Adding these should be straightforward from the control panel of your chosen registrar. Once this step is done the hostname will resolve to your machine so you don't need to memorise the IP.
Reverse DNS
From your hosting company control panel you should be able to set the reverse DNS of your IP addresses. This allows to find the hostname of the machine starting from the IP address and is used, in many cases, to increase the legitimacy of your network particularly in email servers.
Login to your hosting control panel and for each IP address (both IPv4 and IPv6) set the reverse DNS to be the hostname you chose in the previous step. Steps may vary slightly depending on your hosting provider.
resolv.conf
This file is located at /etc/resolv.conf and is used to specify which name servers your machine should use when performing DNS lookups and which should be the default search domain.
From your shell open the file using vi or any other text editor of your choice and ensure it looks similar to the listing below replacing DOMAIN with your chosen network domain:
search DOMAIN.net
nameserver 8.8.8.8           # Google
nameserver 8.8.4.4           # Google
nameserver 217.112.87.147    # PoundHost (my hosting provider)
The first line ensures that whenever you refer to another machine just by hostname your DOMAIN.net will be appended. So for example, if you had a second web server web1, from your server you could simply type ssh web1 to automatically connect to web1.DOMAIN.net assuming the IP address has been configured at your registrar.
The following three lines specify which name servers should be used. I usually use Google for my first two choices and default to my hosting provider's name server for my third choice (just in case Google stops working).
hosts
This file is located at /etc/hosts and is used for internal routing. You should simply ensure it looks like the following listing and append any other server hostnames you may be managing (I have inserted two additional lines for example purposes where the values would need to be replaced):
127.0.0.1  localhost localhost.localdomain localhost4 localhost4.localdomain4
::1        localhost localhost.localdomain localhost6 localhost6.localdomain6
IP1        HOST1.DOMAIN.net HOST1
IP2        HOST2.DOMAIN.net HOST2
network
In this file, located at /etc/sysconfig/network, we specify the hostname of the machine. It should simply reflect the listing below with your chosen hostname:
NETWORKING=yes
NETWORKING_IPV6=yes
HOSTNAME=HOST.DOMAIN.net
Network Interfaces
I am assuming you only have one network card/interface but even if you have more than one the same set up applies to all. You can check your network interfaces with ip link show. You should see your loopback interface, which simply redirects to your own machine, and one or more other network interfaces. On my latest machine I had em1 and em2
Each interface will have a file located at /etc/sysconfig/network-scripts/ifcfg-NAME. Ensure each file has the appropriate settings by replacing the variables in the listing below (I have left the interface name as em1):
DEVICE=em1
BOOTPROTO=static
IPADDR=XXX.XXX.XXX.XXX                  # Main IP address - already set
IPADDR0=XXX.XXX.XXX.XXX                 # Add any other IPs in order
SCOPE="peer XXX.XXX.XXX.XXX"            # Already set
GATEWAY=XXX.XXX.XXX.XXX                 # Already set
NETWORK=XXX.XXX.XXX.XXX                 # Already set
HWADDR=XX:XX:XX:XX:XX:XX                # Already set
NETMASK=XXX.XXX.XXX.XXX                 # Already set
ONBOOT=yes
TYPE=Ethernet
DNS1=8.8.8.8                            # Google (not needed)
DNS2=8.8.4.4                            # Google (not needed)
DNS3=217.112.87.147                     # PoundHost (not needed)
IPV6INIT=yes
IPV6ADDR=XXXX:XXX:X:XXXX::X:XXXX/XXX    # Your IPv6 address range
IPV6_DEFAULTGW=XXXX:XXX:X:XXXX::X:XXXX  # IPv6 gateway - first IP of your range
IPV6_AUTOCONF=yes
IPV6_FAILURE_FATAL=no
Firewall
CentOS 7 comes with a new interface for managing the firewall: firewalld. A description on how to use this tool and how it replaces (to some extent) iptables is beyond the scope of this tutorial but you can refer to the official documentation as a starting point if you are interested.
Below you can find the script that configures my firewall with the default settings (you just need to change the interface name). It simply assigns the interface to the default public zone and only allows SSH access both over IPv4 and IPv6. Assigning the interface to a more restrictive zone would require us to be slightly smarter to keep IPv6 working correctly.
#!/bin/bash
#
# firewalld default configuration script.
# Usage: ./def-firewall.sh

firewall-cmd --set-default-zone=public
firewall-cmd --permanent --zone=public --add-service=ssh
firewall-cmd --permanent --zone public --remove-service dhcpv6-client
firewall-cmd --zone=public --change-interface=em1
firewall-cmd --reload
To run the script above, open a new file in your root home directory (/root) with vi def-firewall.sh or similar. Copy and paste the contents, change your interface name if applicable, save and close the file. Make the file executable with chmod +x def-firewall.sh and run it with ./def-firewall.sh.
At this point all your network changes are complete. You could simply restart the network manager but to ensure everything is loaded properly I restart the server with shutdown -r now and re login via PuTTY after a minute or so. If by any chance something goes wrong and you lock yourself out, open a support ticket with your hosting provider and request KVM access to your server. You will then be able to login via root as if you were physically located in the data centre and you can fix any mistakes you may have committed.
Lockdown
The machine is now ready to be locked down properly. Change password of the root user with passwd and follow the prompt. Use a long but memorable password that only you know.
Users
It is good practice to avoid using the root account unless necessary. Therefore always create a new account for yourself and remove root access via SSH. Let's start by adding a new user (my user name is mst, replace with your chosen user name where relevant) and group (choose something sensible) by typing the following at the prompt:
groupadd GROUP
useradd USER
passwd USER               # Choose your password
usermod -a -G GROUP USER  # Add the user to the group
We now want to allow our user to elevate to root when needed using sudo. Open the sudo configuration file by typing visudo and add the following line towards the end:
%GROUP ALL=(ALL) ALL
Replace GROUP with your chosen group name. Now your new user, or any other new user you create and add to your chosen group, will be able to elevate to root by typing sudo -u root -i. Note that the wheel group, which should already be present on your system, has the same purpose but I personally prefer to create my own.
Public Key Authentication
You should now login as your user either by using another PuTTY window or by typing sudo -u USER -i at the prompt. Before we create a key we need to set up the relevant folders. Type at the prompt:
mkdir ~/.ssh
chmod 700 ~/.ssh
This creates a hidden ssh directory in your home directory and sets appropriate permissions so that no other users can access it. At this point ensure you have Pageant and PuTTYgen on your machine (should be downloaded from before). Open puttygen.exe and generate a key pair (Mac/Linux users can perform the following steps using ssh-keygen). Save both the public key and private key on your local file system. You should now have two files: USER.ppk (the private key) and ISER-pub.key (the public key). Ensure you insert a long pass phrase for your key.
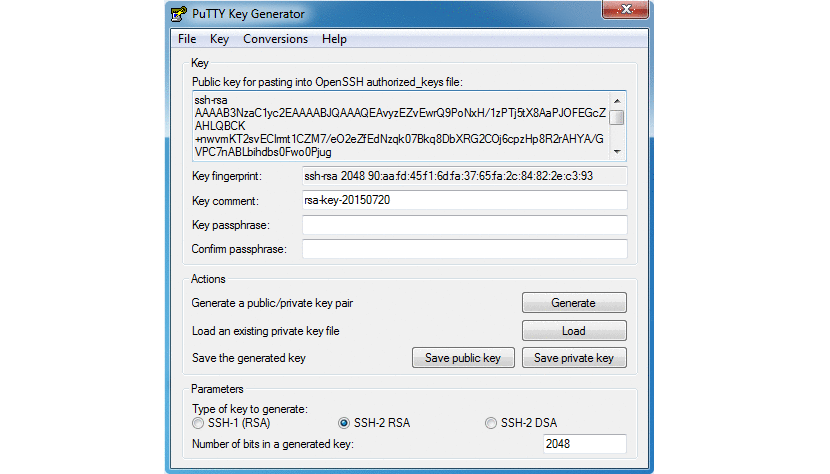
Copy the public key from PuTTYgen (found in the field identified by Public key for pasting into OpenSSH authorized_keys file) and save it into a new authorized_keys file:
vi ~/.ssh/authorized_keys        # Paste public key and save
chmod 600 ~/.ssh/authorized_keys
We can now create a profile in PuTTY so that you can perform password-less SSH login:
- Open a new PuTTY window;
- In the host name field type your chosen host name (like HOST.DOMAIN.net);
- Under Saved Sessions type the name you would like to call this session. I usually use the host name of the machine;
- Under Connection -> Data type your user name in the Auto-login username field;
- Under Connection -> SSH -> Auth browse and select your private key file under the Private key file for authentication field;
- Go back to your sessions and click Save.
You can achieve the same steps under other operating systems. You can now load your session and click Open and you should be able to login using your key. PuTTY may ask you to type your private key pass phrase before hand but you can perform this step once by loading your key in Pageant. You will then not need to type your password again unless you restart your computer.
SSH Config
As we now have a key set up we can configure SSH to disable password login attempts. Please note that you need to make sure you can login with your key before you perform this step. Alternatively, you risk locking yourself out. Open /etc/ssh/sshd_config and edit:
PermitRootLogin no
PermitEmptyPasswords no
PasswordAuthentication no
AllowGroups GROUP
Replace GROUP with your chosen group name. The various commands should be self explanatory. We can now restart the SSH service to apply our changes:
systemctl restart sshd.service
Utilities
We have nearly finished setting up our new server as we are only missing some nice utilities. Usually it is good practice to ensure we have the latest version of all the software currently installed:
yum update
yum is the package manager used by CentOS and this will ensure everything is up to date. yum works by checking for packages in external repositories. By default only the official CentOS repository is used and this does not contain all the software we require. Let's go ahead and install the third party repository RPMforge by downloading the latest release available here:
wget LINK                                          # Chosen from above
rpm --import http://apt.sw.be/RPM-GPG-KEY.dag.txt
rpm -K PACKAGE                                     # Verify the package
rpm -i PACKAGE                                     # Install
Now that RPMforge is installed we have access to a number of additional software. The list below is optional but I highly recommend it. It is an exercise for the reader to discover and understand what each software tool does:
yum install htop
yum install bind-utils
yum install telnet
yum install smartmontools
Fixing Time
To make sure time is synchronized on the server and that it updates in a smooth manner, without breaking other software that relies on time (Dovecot for example), we need to set up NTP:
yum install ntp
systemctl enable ntpd.service
systemctl start ntpd.service
And that is all folks! This is my default CentOS 7 server set up. Of course this is just the start as you would then configure the server for your specific needs (e.g. email server, web server, game server etc.). I hope this tutorial is useful and feedback is very much appreciated especially if you notice any mistakes or improvements. Feel free to leave a comment in the form below.